Add new language attribute to webshop
This guide will walk you through the process of adding a new attribute to the existing ‘Languages’ attribute in WooCommerce. Attributes are meant for product variations, in this case the language of the audiofiles. NOT the language of the product page itself. It’s crucial to start by creating the attribute in English, which serves as the base language, before translating it into other languages.
Step 1: Add new language
Navigate to Products -> Attributes
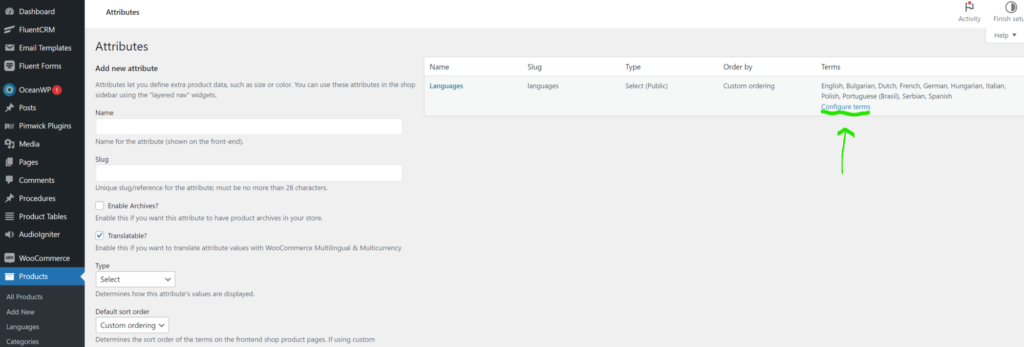
Click on ‘Configure terms‘ on the ‘languages’ attribute taxonomy.

On the column on the right you can observe the existing terms, in this case languages. The fields on the left allow you to add a new language term.
Simply fill in the ‘Name’ field with the language name. There is no need to fill in ‘Slug’, this will be automatically generated upon saving the new term. Leave the ‘description’ field blank and make sure the selected language is ‘English’. Once you are satisfied with the new Attribute name, click on the ‘Add languages’ button.

Step 2: Translate the newly added Language Attribute
Visit WooCommerce -> WooCommerce Multilingual & Multicurrency
Select the ‘Attributes‘ tab

On the ‘Select the attribute to translate:’ part, select ‘Languages’.

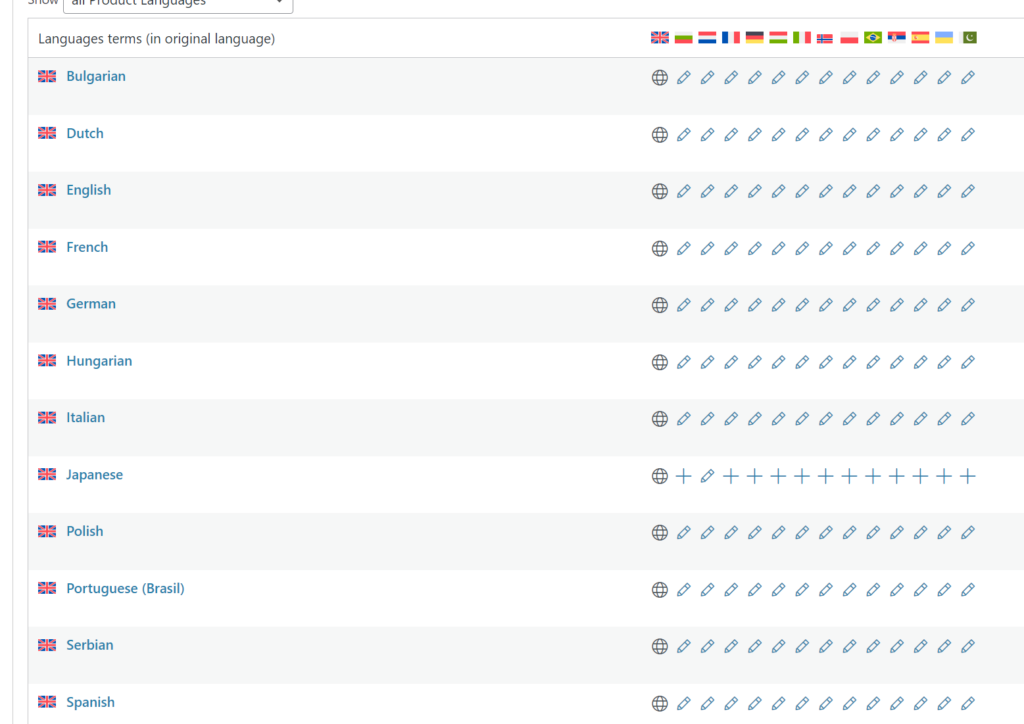
As you can observe in the next picture, terms that have been translated have a ‘pen’ icon, witch allows you to edit the existing translation. Terms that are not translated in a particular language have a ‘+’ symbol.

To add a new translation in a particular language, simply click the ‘+’ symbol next to the term you wish to translate, in the column underneath the flag witch represents the language you want it to translate to. In the following example we will add a Dutch translation to the example language term ‘Japanese’, created in the previous example.

Translate the term name in the ‘name’ field. When you click the ‘slug field, WPML will automatically generate the slug.
Click ‘Save’.

After you clicked ‘Save’ WPML will update the term translation in the background. So it might take a few seconds before the ‘+’ symbol changes in to the ‘pen’ symbol’.

Repeat the previous steps for all the website languages until all the ‘+’ symbols turned into ‘pen’ symbols.
Congratulations! The new language attribute is now ready to be used for WooCommerce products.
